|
|
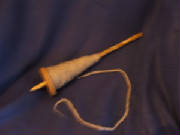
| Handmade spindle with clay whorl and whittled shaft |
the first drop spindle you buy is the right one for you?
There are sooooo many to choose from, and they come not only in all shapes and sizes, but with an equal variety of price.
And your first experience will colour how you look at the whole craft of spinning, not just drop spindles!
In the bad old days, we learned to drop spindle on a boat anchor, as the first step towards spinning on a flyer wheel,
and most of us jumped in and got a standard heavier bottom whorl spindle, with 12 inch shaft, and capable of spinning much
thicker yarns rather than lace-size yarn. We fumbled for a while, learning about the drop part of drop spindle, then we
hurriedly, and gratefully, moved on.
But that doesn't work for everyone, especially as nowadays spindling is recognised as a skilled craft in its own right,
so a first spindle needs to be a lot of different things to a lot of different spinners.
The purists will probably throw their hands up in horror at what I am about to suggest, but there are a lot of lovely
hand-crafted spindles out there that never see the light of day, purchased by people who decided to try spinning, and who
never carried on with it because their beautiful designer spindle was the wrong one for them. Rather than making that mistake,
try making your own. There will be plenty of time to purchase a beautifully crafted spindle once you have decided you like
spindling and want to go further.
Making a drop spindle is relatively simple; a 12 inch piece of dowelling, a small brass hook, and the 2 to 3
inch diameter wooden wheel off a childs toy will make one, or two cd-roms and a rubber grommet to hold them in place (see
the Spin-Off site for instructions). These spindles spin very efficiently, and you can decorate them with folk art/paint
or decoupage as well! You can even use a drinks coaster for a whorl, and it doesn't have to be round; a square one will work
too, as long as the hole is in the middle! If it needs added weight, add another coaster.
For a beginner its usually easier to start with a heavier spindle, but not the boat anchor that many spinning wheel manufacturers
think are ideal; the weight of the spindle controls how thick your yarn is, but too heavy a spindle will only break it and
cause frustration! Too light and the spindle will spin back on itself and unspin what you are trying to spin. My preference
was around the 2 ozs weight (I now love light 1 oz spindles), and I still use this heavier weight to ply with if I don't cheat
and use my wheel. However people learn successfully with heavier or lighter spindles so its not fixed in stone. This is where
some Plasticine or kids modelling clay comes in handy as you can temporarily weight your spindle to see how you go. Try wrapping
a little around the shaft. Make sure its as even as possible to keep the spindle balanced. You can later experiment with
putting the added weight around the rim: this will alter the way your spindle behaves, but gives you a chance to see how different
styles of whorl affects performance. There is some science behind this that suggests that the weight at the rim is what keeps
the spindle spinning for any length of time, whereas the weight at the shaft will keep it steady. Your spindle will probably
wobble anyway to begin with, but that usually settles down once you have some yarn wrapped on it.
Real wood is preferable to chip-board or craftwood. Because they are made from wooden chips or dust glued together,
normal use as well as the lanolin from raw fleece and the natural grease from your hands can cause the wood to chip
off and come apart. Also the holes start getting bigger each time you use the spindle. Ply-wood needs to be finished
properly with varnish as it can splinter through use.
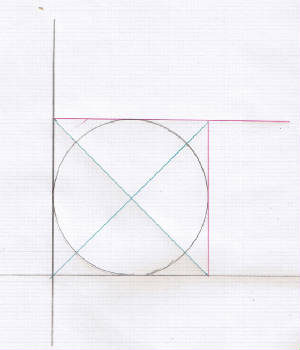
Finding the centre of a circle isn't that hard to do if you have some 2mm graph paper.
Draw a right-angle (or half a square) and put your coaster/round object into it so that the the 2 sides just touch
the item. Trace the circle as accurately as possible. Then fill in the other 2 sides of the square as in the diagram below
in red; the graph paper helps make sure everything is centred correctly. You can calculate the diagonals, from corner to corner
using a ruler (done in green ink), and use them to mark the centre point on your coaster. Drill your hole!
|
| One way of finding the centre of a circle |
You can also trace around your spindle whorl onto a piece of paper, cut it out, then fold it into quarters. That will
give you your centre point so you can mark it on the whorl and drill your hole.
Don't worry if your hole is slightly off centre. Back in the dark ages people were able to spin yarn to make very fine
cloth on spindles that had clay or stone whorls, and had been nowhere near a wood lathe! So a slight wobble
as you spin isn't deadly, especially in a top whorl spindle which seems to be far more forgiving than a bottom whorl spindle.
If the total weight of your spindle is a couple of ounces, thats fine, but you don't want it too heavy - it will break
apart any yarn you try to spin. You will also need about 2 foot of wool yarn to use as a leader. Don't glue anything at this
stage as you need to make sure that you can turn your spindle from a bottom whorl spindle to a top whorl spindle
without any dramas.
Your spindle shaft may just be too long for you, especially if you find a top-whorl spindle easier to use. However,
if you are interested in thigh or supported spindling, you will need a longer shaft. A couple of spare pieces of dowell in
different lengths is a good idea as it allows you to experiment before you finally settle on what is most comfortable.
There are plenty of instructions available on how to spin in many different styles and techniques, read them and try it
out. My spinning instructions start here:
http://https://kero1au.tripod.com/id26.html
Interweave Press, the publishers of Spin-Off magazine, have some excellent how-to files in pdf format for you to download
here:
http://interweave.com/spin/projects_articles.asp
There are instructions on this site, and both the Spindlers and Spindlitis Groups on Yahoo have excellent instructions
and help. You will find the links below. I can also recommend the reprint of Priscilla Gibson-Roberts Book, Spinning in
the Old Way, as well as Interweave Press's own A Handspindle Treasury. You-Tube also has some brilliant videos; do a search
for "drop spindle". You can download the instructions to make David Reed Smiths ultralight Lisard spindle here:
http://davidreedsmith.com/spinning/Lisard.htm
This spindle has its weight on the rim, and comes in at about 8 grams, depending on materials used. This is where some
modeling clay could be useful to add a bit of weight.
Do not assume that just because you are right-handed, that that is how you will spin. Try and control that spindle using
both hands alternately - one hand will be easier to use than the other, so go with it! There is time enough once you have
mastered the skill to experiment with your other hand and different techniques.
|
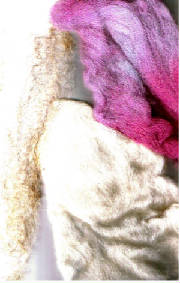
| Commercial Merino Top and Batt, with a bit of hand-picked Romney |
Commercially prepared tops are probably not the easiest fibres to start with. The fibres can be compressed so that they
do not slide past each other easily and will require a bit of preparation, known as pre-drafting where you divide the tops
into half, then half again, and so on, until you have what is about the size of a pencil thickness that you actually start
spinning with.
Try and find a spinning batt if you can, there are usually plenty on Ebay. You will still have some preparation to do
before you can actually spin as the fibres need to be fluffed out so they are light and airy. Batts can be divided down the
middle like the commercial tops, or you can pull chunks off sideways. You use them to spin what is called a woolen-type yarn,
which is nice and fluffy and airy.
In Australia we are lucky enough to have fleece available that can be prepared purely with our fingers. For some spinners,
a raw fleece is more than they can stomach, and unless its fresh, it can be difficult to handle if the lanolin/grease
hardens through age. Even if you don't mind the earthy aroma, you might be better off saving an older fleece for when
you are learning how to scour and dye.
If you absolutely must use that fleece, you don't have to spend a fortune on carders and combs. Your local pet supplies
store should have some excellent spinning tool substitutes from horse combs to cat flea combs, and a dog slicker brush with
what looks like bent wire staples sticking out of it is a much cheaper option than a flicker. It also works better than
a flea comb as it fluffs the fibres out more, and its a good idea to have both.
If you fancy trying your hand at making Combs and/or Hackles, these 2 blogs have innovative and simple to do ideas:
using "afro" combs and clamps. This page takes a while to load but is worth waiting for.
The $15.00 wool comb
There are some excellent instructions on using various tools available from spinning sites and blogs, as well as Yahoo
spinning groups files.
Click here for Ispindle, one of the best!
The main thing to spinning is to enjoy it!
Some people find the smooth rhythm of the spindle and the regular motion of their hands very soothing, almost like meditating,
and there is certainly something very satisfying when you produce your first skein of yarn, no matter how lumpy or bumpy it
is - perfect for knitting or crochet, and then felting! Its also perfect for plying with a novelty acrylic or nylon yarn like
feathers or lashes, for felting, or warmth.
Treasure it! Once you start producing perfect yarn, you will have all sorts of problems learning how to spin a lumpy
bumpy novelty yarn all over again!
And then there is the retail therapy: there are some lovely hand-crafted drop spindles out there, and there will
be more than one with your name on it, and then there are the different types you can get, Russian, Balkan, Turkish,
lace, etc........... and don't forget the fibres! And besides, how can any one say its a waste of money, you end up with
something useful, right?
And don't forget, there is no such thing as too much fibre, only not enough cupboard space!
(c) C Barlow 2006/2007
Try your hand at spinning:
|