can be made quite easily from a small picture frame. Most bargain stores have wooden shadow boxes, or craft frames that
are suitable. Mine had some charms inside, as well as a piece of glass, but at 4 inches by 4 inches, it was exactly what I
wanted. A larger one can be made from an artists canvas frame with the canvas stripped off. They are ideal for holding
threads under tension, and the frames are light and sturdy.
Stripped down and the frame reversed, I used a small craft multitool to drill very fine holes in it to stop the wood
from splitting, and used cut down dress-makers pins as nails. I used 25 pins per side, which has made it rather fiddly to
use, and limited the size yarn I can weave with. The picture shows mohair, the equivalent of 8 ply (Australian), something
like DK (USA) size.
I would also recommend a couple of coats of varnish, just to hold the pins in place, or else wood glue diluted 50/50
with water.
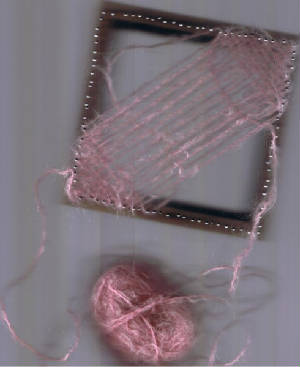
The photo shows the loom being woven on the diagonal, which produces 4 bias edges. It can also be woven as a square.
Weaving a square on the diagonal is pretty straightforward once you have mastered a few basic techniques, and progresses
with a rhythmical movement. Its exactly the same technique I used on the KK loom for the felted container ( Weaving Tools?),
only this time its far easier to see what you are doing!
Tie your yarn to one of the corner pins, and run the thread across and around the opposite diagonal corner, and come
back to the pin immediately before where you started. Wind the yarn round the pin, and here is where the magical part
of this comes in: you will run your yarn across to the first pin the other side of this corner by tucking a loop under the
yarn that is already stretched across the loom. Pull just a bit more yarn through and run the loop to the pin
immediately before the corner pin on the next side. You will see that the yarn naturally goes back under the corner
thread so wind it around the first pin immediately after that corner, then back to the pin immediately before
the corner pin you started with. The photo above shows the loop that goes around the four pins, with the ball of wool
held outside of the loom, and the yarn above the weaving, not below it.
You then repeat this circular movement, under the first diagonal loop, around the next empty pin, across to the opposite
side and around the first empty pin before the corner, and across to the first empty pin before that corner, then back to
start a new circle.
If you have to put your weaving down, you can soon identify where your circle starts as it is immediately before the
corner where you first tied the yarn.
Weaving on the square is very similar to conventional weaving as you will work from side to side across the loom, working
from one pin to the other on the opposite side so that when you have got to the end, you have the threads all going the same
way and parallel to each other. Those are your warp threads.
Turn the loom a quarter turn and start weaving your way across the loom at 90 degrees to your original threads. This
is weaving the weft. The easiest way to do this is to thread your yarn through a long doll needle or something similar so
you can go under, then over each warp thread. I use a locker hook because it has a crochet hook one end, and an eye the other.
When you come back, where you have gone under the warp on the previous row, you will now be going over it, so that you
create a fabric that will not fall apart too easily. If you examine the photo of the diagonal weave, you will see that the
under/over pattern is there too.
This is called tabby or plain weave, and even though its not patterned, it has many uses.
You will find plenty of instructions and inspiration for all sorts of small loom weaving at Jana Trents brilliant
site at http://www.eloomanation.com/index.php including patterned weaving on both the square and the diagonal.
These small squares are ideal for making flowers to decorate bags, hats and more. The two different styles of weaving
produce 2 different results.
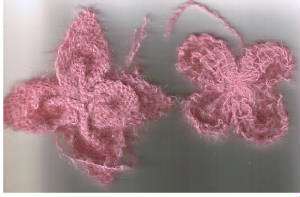 The flower on the left was woven on the diagonal: the flower on the right was woven on the square. They were woven on
the same size loom. Then I used running stitch from top to bottom and side to side to create the four petals. The edge of
the square woven flower was oversewn to make it a bit firmer.
The flower petals can be embellished with beads and embroidery, or even felted to make a smaller, firmer
flower. If you make green squares on a slightly larger loom, you can end up with a flower similar to the one below.
Of course you can also make larger square looms, and then its a very short step to a triangle loom.
A similar building technique can be used to make a round knitting loom from a wooden embroidery frame. I would suggest
glueing the inner frame to the outer frame first, before drilling the holes to place the pegs/nails.
The larger square looms have the added advantage of being suitable for loom knitting as well, either in the round, or
as a rake or table.
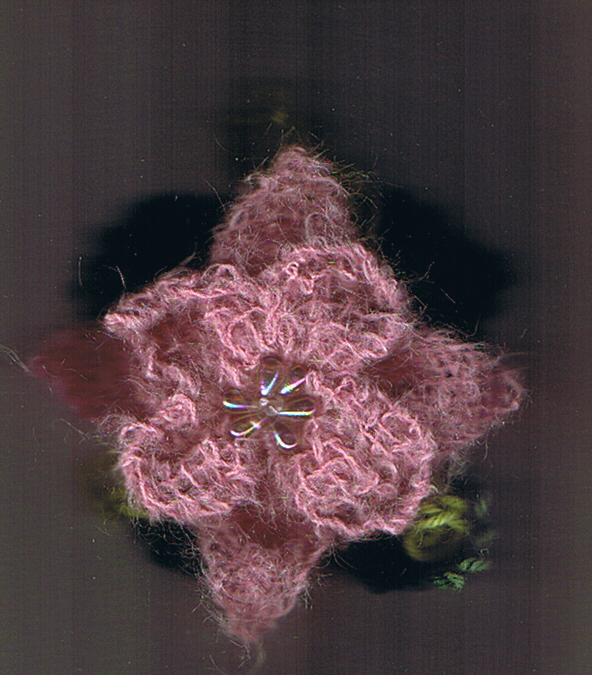
The flower is made from two 4 inch squares, one woven on the diagonal and one woven on the square. The greenery was woven
on the diagonal on a 7 inch square loom using tapestry wool. I also added a triangle in a lighter shade of green, also woven
on the square loom, using the tri-loom technique.
| Square Loom Used as a Butterfly Loom |

|
| Butterfly Loom threading diagram |
Another way to use the small square loom is as a butterfly loom. While the instructions are very similar to the techniques
for the weavettes and other pot-holder looms, you do not go back and forth through every gap, but carry the yarn around 2
pegs at a time. When you have gone up and down, you then wrap side to side, again around 2 pegs at a time. Some instructions
will have you do this several times, but it will depend on the yarn you are using, and how thick you want your fabric.
Once you have completed a multiple of both sides, you then start to weave diagonally. Its better to have started a new
very long thread for this, threaded onto a long dollmaking needle, or using a netting shuttle (very unwieldy, but its in the
instructions I have!) or, my preference, a large-eyed, blunt-ended tapestry needle.
This where the instructions change from those of the weavette-type looms. Each time you cross one of the horizontal/vertical
threads, you tie a half-hitch knot, which holds the whole thing together. When you have finished, which means going from/to
all four corners, you can slip the completed square off the loom. The squares can then be used to make scarves, shawls, afghans,
cushion covers, bags, clothing, etc. And because of the square and diagonal lines, its very easy to embellish with embroidery
and beads.
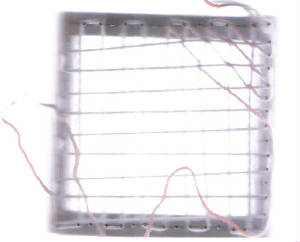
If you are using a loom that is less than 7 inches a side, you may want to skip some pegs. This pattern works equally
well if you go around 2 pegs, then skip one, as per the following photo.
And what can you do with all these squares?
Apart from sewing them together to make blankets, cushions, shawls, scarves, hats, tote bags, jackets, slippers, etc?
In short, anything you can make using a square as the major design and building block. Modular clothing is not a new idea,
and there are many resources on this subject, the best being the Eloomanations site where you will find an archive of pattern
books from most of the small loom makers.
Eloomanation
(c) C Barlow 2006/2007
|