First time spinning can make you feel like an intrepid Victorian explorer in the African jungle
somewhat anxious, but excited at the same time!
Before you dive straight in with your spindle, you will need to do a little more preparation on your fibre. This is called
pre-drafting, and basically gets it ready so that you can spin straight from it.
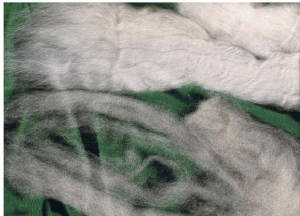
If you are using commercially prepared tops, what you have is a compressed snake-like length of fibre. You have a couple
of options: firstly you can break off a 12 inch piece of top and split it, and re-split it, etc until you have pencil thin
strips of top just a bit bigger than what you would like for your spun yarn.
Or, break off a smaller piece, about the length of your hand, and start teasing it apart, to let the air enter to make
it fluffy. I also like to pull on it gently to get the fibres to slide past each other smoothly.
If you are careful, you can make a light, airy and quite long fibre snake from this piece of top. If it breaks, it doesn't
matter; it just proves its light and airy!
Now you are just about ready to spin.
There are as many different ways to spin as there are people who want to spin, so there is no real right or wrong way,
just what suits you. SpinOff magazine has some excellent pdf files for you to download and study and the link is below at
the bottom of the page. They include spinning with both a top or bottom whorl spindle. I recommend trying both styles, and
using both hands, until you find what you are comfortable with.
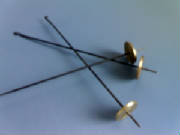
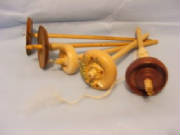
You will need a spindle, preferably one that has a whorl that can be moved, and a leader yarn of about 3 foot of wool
yarn and you will be spinning your spindle in a clockwise direction. Its a good idea to practice with any scrap yarn you have
until you get the action of twirling the shaft of the spindle - its one less thing to worry about while you master the next
step.
It is worth noticing at this point that many modern hand-turned spindles come with very short shafts. This is not a criticism,
but something worth thinking about when you choose your first spindle, as you may need a much longer shaft to start with.
Regardless of whether you are using a top whorl or bottom whorl spindle, the first thing to learn is how to attach your pre-drafted
fibre to the end of your piece of yarn.
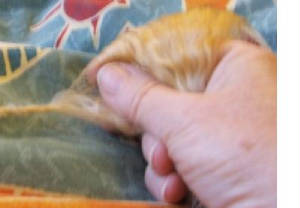
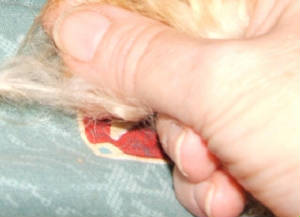
I tend to spin on the fold, with the fibres folded over my middle or forefinger and sliding through the palm and thumb of
my fibre-holding hand onto the twist. I place the loose fibres next to and around the end of the yarn leader thread which
is loosely held between my fingers as in the photo, twirl the shaft, and let the twist travel up the yarn into the loose fibres
and grab them, which should also grab the leader yarn firmly. Its so effective that the next step is to stop it travelling
into the fibres in the palm of your hand! This is where a video is worth a thousand pictures so check out Abby Franquemont's
videos on You-Tube: the link opens in a new window.
Most spinners start with a park and draft technique: you twist your spindle, park it between your legs, then use your spindle
hand to pinch the twist. Draft some fibre with your fibre hand, release your spindle hand and let the twist travel up into
the fibres in the drafting zone at your fingertips. The hand that holds the fibres also controls how much twist you let through,
so while your fibre hand grip on the fibres is loose enough to let them slide through your fingers into the twist, you can
close your spindle hand at any time to cut the twist off. This is much easier to do than explain!
As the fibres slide through your finger and the twist runs up turning them into yarn, you will need to spin the shaft again,
then again, until your arms are stretched wide apart and can go no further. This is when you wind the yarn you have just spun
onto the shaft of your spindle.
Its worth seeing just how much twist you have put into your yarn. You do this by loosening your stretch just a tiny little
bit so that the yarn doubles back onto itself. If it immediately turns into a mass of corkscrews, you have put in too much
twist, and this can be remedied by unspinning your yarn: either spin the shaft in the opposite direction while clamping the
fibres between your finger so the twist doesn't go any further, or else extend your arm out further, so the twist can travel
up the unspun fibres. The ideal is for your yarn to gently ply itself back on itself, but don't worry too much about it at
this stage. If you are going to ply your yarn, some of the excess twist will vanish as you generally ply in the opposite direction
to the one you spin.
As you fill your spindle you will notice subtle changes in the way it spins and feels. Eventually it will get very wobbly
and the yarn will refuse to stay wound on the shaft. This means its time to wind it off.
Some people do this by winding the yarn around a felt ball, others use a toilet roll core, I make a ball around my fingers
and wind it off that way. As the ball you make is a bit small, I generally join several spindle-fulls of yarn together to
make larger balls before plying or winding around a niddy noddy. To join, fluff out the end of the ball, and spin it together
with the end of the yarn on the spindle, just like you join the leader yarn to your first fibres.
Plying is spinning 2 or more lengths of yarn together, and this makes the commercial yarn that we generally see for sale
today. The yarns are spun in the opposite direction from how they were originally spun. There are several different ways of
plying, but that is for another page. Here I am concentrating on the basics.
Once your yarn is how you want it, singles (unplied) or plied, you will be setting the twist. The easiest way to do this
is to skein it on a niddy noddy, a funny stick-like thing with bits sticking out each end, and then dunk it. You can make
a temporary skeiner out of a coat-hanger by bending the wire into a sort of square shape, and winding your yarn around this.
Tie the skein in at least four places before you take the yarn off the hanger so that the threads don't tangle.
To "dunk" it (you would wash a raw fleece at this stage) I use a bucket of as hot water as I can get and gently
lower the skein in it and leave it. Do not stir, prod or poke the yarn, no matter how tempted, unless you are looking for
a felted finish. Some people let it rest for a while, then take the skein out and dunk it in icy cold water to shock the fibres
into fluffing out. Sometimes I do, sometimes I don't, it tends to depend on how cold it is! Either way, no agitating. I then
take the skein out, squeeze the water out gently, then hit it several times against the wall (to force the threads apart)
or something else handy before hanging it up to dry. I also check that all the threads have separated out properly.
If you are dealing with a raw fleece, you would add a cleanser to this bucket of hot water. I use Morning Fresh washing
up liquid from Cussons. Leave the skein in the bucket soaking so the dirt, VM and lanolin floats up to the surface. After
at least 20 minutes, take the skein out of the bucket, (If you are going to dye your skein, only give it this first bucket
with the soap/cleanser) and put it in a bucket of clean water about the same temperature. I change the water, maintaining
the temperature, until the water is clear.
Congratulations! You have spun a length of yarn, and you can now work to make the whole process much smoother, easier
and faster.