Based on looms I have seen on websites while
researching Mapuche weaving, this is an effective loom for both warp-faced and weft-faced weaving; the simple tensioning device
is very easy to install, and the loom breaks down into its component parts for storage. It would make an excellent tapestry
loom.
The width is limited by how far you can stretch your arms to shoot the shuttle. My width was dictated
by the salvaged wood I had at hand, and I will be substituting Jarrah for the pine, just as soon as I learn how to drive an
electric planer.
Materials required:
5 pieces of straight hardwood
4 strong bolts (coach
bolts would not be an overkill) and wing nuts.
2 lengths of threaded steel, and 6 nuts to match.
2 wing nuts to fit the threaded steel.
Drill bit to match the bolts and the threaded steel.
Washers to protect the wood where its bolted together.
Drill press ( ideal) or electric drill
and a steady hand.
Just a note about the drill press: its not the slightest bit scary really. Its much easier to use
than an electric drill and gets the holes nicely aligned and straight. If I can use one, anyone can!
You should also think about safety glasses here in case anything flies out and enters your eyes.

|
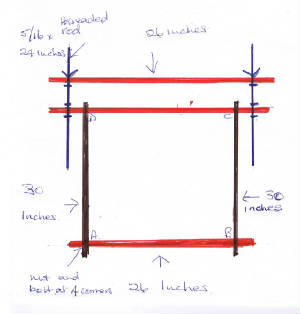
| Diagram of my Mapuche style loom |
My uprights are 30 inches of dressed
pine, 2 x 1 inches, and the cross pieces are 26 inch hardwood of 1.5 x 1.5 inches, because thats what was at hand.
The steel threaded rod, is 5.16 by 24 inches, making this loom ideal for long sashes as well as wide enough for a
bag or cushion cover, or scarf - even half a poncho. It will happily take a circular warp of about 8 feet.
First, I drilled the holes in the two top cross pieces to take the threaded rod, and then turned one of the the two
pieces 90 degrees. I then took the middle and lower cross pieces and drilled the holes for the uprights slightly inside the
holes for the threaded rod. I drilled through the uprights at points A, B, C and D, and bolted the lower 2 cross pieces to
the FRONT of the uprights, close to the top and bottom, which allows the warp and cloth to wind around without touching the
floor. I then slid the threaded rod through the matching holes in the top cross pieces, added the nuts and wing nuts,
and its all done!
Because I was using recycled timber, the whole thing
took less than half an hour! And is the easiest loom I have built so far.
Warping up:
You can warp up in the traditional Mapuche or Toba way, directly onto the loom. There is an excellent tutorial here to get
you started weaving a band:
Toba sash instructions on Carol Venturas' site
I prefer warping up using sticks or
a warping board, then transfer my warp to the loom, stretching it around it and fastening with shoe laces, bungee cords, or
other strong ties that allow me to weave in comfort, and move the warp around as needed. This is adapted from the backstrap
technique, the difference being I have a frame, rather than using my body and a convenient post. You can simply adapt backstrap
basics to get warped up, and create string heddles; and then go on to use backstrap and inkle patterns to create beautiful
woven bands.
Backstrap Basics
For another band pattern that can
be done on this loom, using similar techniques, here is a project based upon a Yurt band I purchased on ebay. This uses 3
warp threads of different colours instead of the traditional pair of warps in the one space, and makes a colourful band. Its
a simple pattern once you get the technique off pat, and the same warp can be used for many other designs, even free-hand
designing on the fly!
This technique and similar variations on it can be found in the book Bolivian
Highland Weaving by Casson and Cahlander, Band 13 onwards.
Yurt Band or Tesma from Uzbekistan
For many larger size woven pieces, South Americans and Central Asian weavers alike will use an oblique loom that leans
up against a wall.
Mapuche loom
This loom is contructed from hardwood, with a series of matching
holes up both side pieces. To this are attached the 2 beams, and also a heddle bar, as in western tapestry looms. Other cross
pieces could be added as needed, and because the beams are lashed on, its easy to adjust for different sizes of weaving. Its
suitable not only for the warp faced weaves used by many tribal weavers, but the weft-faced weaves also found in tribal weaving.For what weavers in China achieve on their backstraps, please see my photostream
on Flickr:
Chinese ethnic brocade weaving
If you prefer to make wider more balanced weavings, then you
can use any pattern suitable for the rigid heddle loom. Good books to start with are Betty Davenport's "Hands on Rigid Heddle
Weaving" and "Patterns and Textures for the Rigid Heddle Loom", as well as the projects on Weavezine that have been written
for the rigid heddle loom.
Weavezine articles
Nor are you limited to plain weave and its variations. Once you are familiar with the use of a pick-up stick, you may find
that many of the weaves suitable for multishaft looms can be done using string heddles. The weaving is slower, but the beautiful
ethnic pieces you can see on the internet show how worthwhile it is, and there are many weavers pushing the boundaries as
far as "simple" weaving is concerned. Sometimes its easier weaving something complicated on a simpler loom than fighting with
a multishaft loom that refuses to do what you want!
|
