|
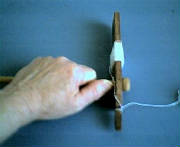
These spinners are used by the Maya of Guatemala to spin vegetable fibres . Boy Scouts in the USA make something very similar
for one of their badges . It provides the modern spinner with a versatile tool that takes up very little room, and gives
excellent control over the yarn as it is formed.
The spinner comes in 2 parts: the shaft and the spinner itself. By holding the shaft in one hand to rotate the spinner
around it, and drafting the fibres with your other hand, you create yarn. If you already know how to spin, draft with your
drafting hand as with a spindle or wheel and use the non-drafting hand to spin the spinner. If you have never spun before,
it will be trial and error to begin with until you feel comfortable with the hands you are using for spinning and drafting.
For the most comfortable way to spin, clasp the shaft with your thumb up towards the bead. With the shaft through the
spinner, gently rotate the spinner around the shaft, using your whole lower arm rather than your wrist muscles. With a bit
of practice you will be able to do this without any perceptible movement of your arm or elbow, and even rest your arm on a
cushion or chair arm! Its best to get this right before trying to spin, as you can end up with a very sore arm if its not
done correctly.
Once you have the movement, turn your arm so the shaft is horizontal across the front of your body, and the spinner comes
up over the back of your hand and your knuckles and down between your hand and your body as it rotates (anti-clockwise for
right hand). From here onwards, I will assume you have never spun before.
These instructions are for wool top/roving.
Unless you are lucky enough to have pencil roving, you will have to do some pre-drafting to your fibres before you can actually
spin with them. Gently pull off a piece of top/roving about 12 to 14 inches long; it will probably be as thick as your wrist.
Carefully separate it into two lengths of equal width; keep splitting it until its about the width of your finger, which is
probably 8 pieces. Be careful not to make it too thin as it will collapse. If that happens, don’t worry, it can still
be used for spinning.
Take a length of the roving and start drafting: pull it gently to lengthen it and separate the fibres. Roll about 6 to 8
inches of this on your thigh to get it to twist enough so that you can attach it to the neck of the spinner by a half hitch
knot. Hold the other end pinched between your fingers, about 5 or 6 inches from the knot. You are now ready for the serious
stuff!
Hold your arms out in front of you so they are both roughly horizontal and rotate the spinner. You will see the spin slowly
moving up the fibres, which tighten and get firmer as the twist gets stronger. Once you have enough twist, usually when it
gets a bit difficult to spin, park the spinner between your knees without letting go of the fibres. This is what is called
the park and draft method. With your spinning hand, replace the hand that is holding the fibres and move that hand a bit
further up the roving, drafting as you go, then pinch the roving again. Slowly let your spinning hand slide up the roving
to join it: the twist will travel up with you.
Congratulations, you have made yarn!
Have a good look at it, and bring your hands closer to the spinner. If the yarn loops back on itself, you can slowly inch
your hands further up the roving and spin more yarn without turning the spinner again. Aim for a 45º angle on your yarn to
begin with; it's a bit tight but it won't fall to pieces. Once you are satisfied that you cannot inch any further, rotate
the spinner again and repeat the process.
When you have enough yarn to wind on, untie the half hitch knot and wind the yarn onto the broad bit of the spinner for storage.
Retie the half hitch, and start spinning again.
Adding on fibre is easy as the twist draws in the fibres, so all you have to do is hold the last few fibres of one piece of
roving together with a few fibres of the new piece of roving and let the twist do the rest. This is how you use those bits
and pieces from your trial drafting efforts.
With a little practice you will get faster and your movements will become less jerky until you can spin and draft at the same
time. You will also find that you can control the twist to allow it to become as tight or as loose as you want it to be.
Aim for a twist that just holds the yarn together.
When you have wound on so much yarn that the spinner won't take any more and has become quite unwieldy, it is time to stop
and unwind the yarn. You have spun what is called a singles yarn which can be used for knitting or crochet or as weft for
weaving, after it has been set. Or you can wait until you have more so that you can ply it together. Plying is spinning
2 or more singles together, usually in the opposite direction from which they were spun, to make a stronger and thicker yarn.
Wind your spun yarn into a skein. Usually this is done on a niddy noddy, but can also be done using a metal clothes hanger
to wind the yarn around. Pull the hanger top, sides and bottom until it makes a rectangle and wind the yarn onto it. Tie
the skein at four points or more to hold it together, until you are ready to go on with the next stage.
To set the twist, dunk the skein into very hot water being careful not to swish it around, as this will felt it. Take it
out of the hot water, supporting it (a colander will do nicely) and dunk it in cold water, also no swishing. This will shock
the yarn into fluffing up, and set the twist so that it doesn't unspin itself. Hang the yarn to dry out of direct sunlight,
and weight the bottom slightly to stretch it out a bit again and stop it kinking. You can also put it back on the metal hanger
to stretch it as it dries.
Even if it looks too thick and lumpy to use, your early spinning efforts can be put to good use making hats, scarves and slippers.
Look on line for patterns.
You can also ply your yarn with one of the fancy fluffy acrylic or nylon yarns to make a great knitting or felting yarn, or
even thread some seed or other small beads or sequins onto some overlocker thread and ply it together to make your own fancy
designer yarn!
Sarah Bradberry shows you how here:
|