how about card weaving, or tablet weaving as its sometimes called?
All you need to get you started is an old pack of cards, preferably plastic coated, some paper scissors, a single hole
punch, a metal edged ruler (optional) and a texta, and your weaving yarns. Any yarn is suitable as long as it isn’t
fuzzy, but cotton is probably best for colour and smoothness.
A couple of “S” hooks would be handy, as well as rope or an old belt, and a few bits of dowel.
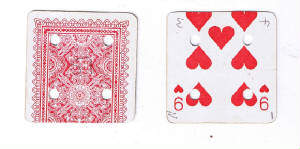
Take your cards: you are going to square them off, and the quickest way to do that is to lay one over the other sideways
on and trim the overlap. If you want to get fancy you can round the corners. Cardboard drink coasters would do the job, but
they probably won’t be as smooth and the yarns could catch.
Using the hole punch, punch a hole in each corner. Then mark them “A”
to “D” with the texta, making sure you have done them all the same way.
Each card will hold four strands of yarn, and how the yarn is put through those holes, and the colour sequence you
use, is very important as this makes the pattern.
You can use up to 4 different colours per card for very complicated patterns, but a simple pattern using 2 or
3 colors is best to start with. You can look for books on the subject if you want to take it further.
Try this simple pattern to start with:
-
10,9,8,7,6,5,4,3,2,1
-
B
B R R B B R R B B
-
B R R B B B B R R B
-
B R B B R R B B R B
-
B
B B R R R R B B B
-
b,b,b,b,b,f,f,f,f,f,
The top row has the card numbers, generally from right to left.
Then comes the threading (rows 2 - 5). Hole A has 2 black, 2 red, 2 black 2 red and 2 black, acros the 10 cards
Hole B has 1 black, 2 red, 4 black and so on.
So reading down, instead of across:
Card number 1 is threaded from front to back with 4 strands
of black,
Card number 2 is threaded from front to back with black, red, red, black,
Card number 3 is threaded from front to back with red, red, black, black and so on.
Card number 6 is threaded BACK to front, black, black, red, red, etc
In this sample
threading, cards 6 to 10 are threaded from the back, and cards 1 to 5 are threaded from the front, as is shown in line 6.
Some of the older drafts show the threading direction above the colour lines, and others use arrows pointing up or down.
When you have threaded all the cards, fasten some string around them so they don’t get muddled up and out of
place.
You will now need to tie the thread ends together, and hang the back threads on a hook somewhere where you
can get a good tension if you fasten the front threads to your body; if you are outside, a tree branch would be good, but
a door handle is fine, as long as the door is firmly shut.
The other end will go around your waist: this is where the belt comes in as its easier to attach the end closest to
you to some dowel, and the dowel to the belt. You can keep a nice firm tension necessary for weaving depending on the position
of your body.
You will now need a shuttle that will hold some thin yarn, which is the weft that will hold the warp threads together
as you turn the cards and weave. The shuttle can be made out of cardboard for the moment, but you might want to get some wooden
ones if you are going to make several items. A ruler makes a handy beater, and you can use your fingers to comb the tangles
out of your yarns.
There are several ways to turn the cards; this one will give you what is called a balanced weaving as the threads are
turned forwards and back the same number of times, to balance out the twist that developes.
You can do 4 quarter turns forwards and 4 quarter turns
back, or 8 forward and 8 back. They will give different patterns. Its tempting to just keep turning forward, which would give
continuous chevrons, but you would soon find yourself with a horrible mess that would either require turning the cards
back in the opposite direction, or unfastening the warp to comb it out!
Holding the bunch of cards so that the D-A side is facing you, untie the string holding them together. Holding the
yarn at tension, you can see that the cards make a small shed
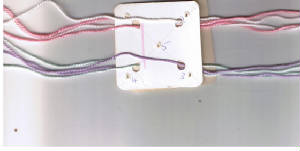
pass the shuttle though
making sure you leave a tail of yarn out the other side. Turn the cards towards you so that the side facing you is the A-B
side ( quarter turn).Use your fingers to separate the yarns and check that you can see a shed, then pass the shuttle back
to the side it first came from. Use the ruler, or something similar to beat the yarns together so the coloured yarns through
the cards completely cover the weft/shed yarn. Once again turn the cards towards you so that now the side facing you is the
B-C side, pass the weft shuttle through, beat it etc. Then once more turn the cards towards you so that you are now facing
the C-D side, and repeat. The threads behind the cards probably look a mess as they will be twisting too with each turn
of the cards. Don’t worry, this is what is supposed to happen and means you are doing it right!
Now, you are going to reverse your actions. And turn the cards back the other way so that the C-B side is facing you.
As you work back, any mess behind the cards will gradually sort itself out.
If you look at your weaving, you will see that you are making a coloured patterned braid. Carry on until it’s
the length you want, then cut it free of the cards, making sure you have left a good length of threads both ends. You can
knot this into a fringe if you like, or weave the threads back into the main body of the weaving as you prefer.
The braid you have made is very strong, and can be used for belts, guitar straps, harnesses, rug edgings and so on.
They can also be sewn together up the selvedge (edge) to make purses, bags and cushions.
Instead of passing the shuttle to and fro, as I have explained, you can also pass it through just one way only, then
around under the warp, change shed, and through again, making sure you keep the weft thread tight so it creates a round I-cord.
This is handy for making shoe laces, and other forms of lacing or fancy cords.
You can set up card weaving on a loom; the inkle loom is suitable, and some weavers set up card weavings either side
of the main warp threads on their floor looms to take advantage of the patterns you can create, and the strength of the selvedge.
This is only meant to be an introduction to card-weaving, and no substitute for the many weaving books available.
Candace Crocket’s excellent book, Card Weaving has been reprinted, and Amazon and Ebay often have second
hand weaving books for sale.
There
are also some great card weaving sites around, and I would suggest starting at the Weavers Hand
http://www.weavershand.com/
for some useful links. You will also find lots of pamphlets and articles at
http://www.cs.arizona.edu/patterns/weaving/monographs.html
including some by Linda Hendrickson, who has also written a book especially for beginners. She has a great site full
of information at
http://www.lindahendrickson.com/
But above all, have fun with this portable and colourful technique!
(c)
Caroline Barlow 2006.
|
|