Every time there is a new craft craze, a new you-beaut and generally expensive must-have tool is also promoted, to be
relegated to bargain bins and op shops once the fashion changes. But a quick look at these items will soon tell you its very
much a case of everything old is new again, and a spot of lateral thinking will soon find a new use for the discarded item.
Knitting, crochet and felting are very "in", but as any newbie knitter or crocheter will tell you, it does take a long
time, and the craze will be long past when the techniques are finally mastered. So.......??
The cheating woven, knitted, felted container:

(while I
have specified a KK loom for this, a square pot-holder style loom will work just as well, except the container will be square. See
Looms Too and 3 for hints.
You can also
make a round loom from an embroidery ring by gluing the 2 pieces together, then carefully drilling holes around the circle
before putting in pegs or nails.)
For this
you will need a round knitting loom. I used the adult size green KK loom, but branding is not important as long as its fairly
large, and still has all its pegs ( even that could be flexible).
You will
also need pure wool that is guaranteed to shrink. It can be oddments, which will add to the character of your container, homespun,
or whatever, the brighter the colour the better. I used homespun of various different types, with an interesting result. You
will also need a hook of some sort, a crochet hook is ideal, as long as its quite strong.
First of
all, you are going to use the loom to weave the base. Unless you have very bulky homespun, you will be using your yarn doubled.
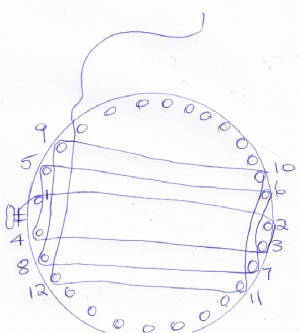
Tie the
end of your yarn to the peg on the side of the loom, then wind the yarn around the outside of the nearest peg. Now find the
center peg the other side of the loom to that and bring the yarn across and wind around that one and the peg next door.
The following
diagrams/pictures should help explain what you will be doing.
| Continuous weave on a circle loom |
|
First of all, anchor your yarn on the side peg. Now you will be winding the yarn from peg to peg as in the diagram, basically
in a square. If you are familiar with making squares on the diagonal of a square loom, you will see that this is exactly the
same technique, except its on the round!
Also, as weaving generally means that your thread is going over, then under, to form the woven web, this will also be
happening at the same time. Confused? Don't be, it will suddenly click!
Starting at peg one, bring the yarn up to peg two, around it and back to peg 3, around that, then to peg four. This is
where the magic comes in!
Take the yarn from peg 4 across to peg 5. Notice that it goes on top of the thread from peg 1 to peg 2.
Now you are going to take the yarn from peg 5 to peg 6, but you will be weaving it under then over each of the other
threads alternately. Keep it very loose, and once you have wound the yarn around peg 6, run it down to peg 7 and watch what
is happening: it is also going over and under at the peg 7/8 end. So you can weave both ends at once, which really saves time.
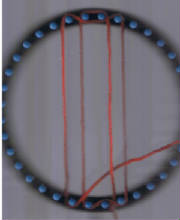
showing the first over/under movement
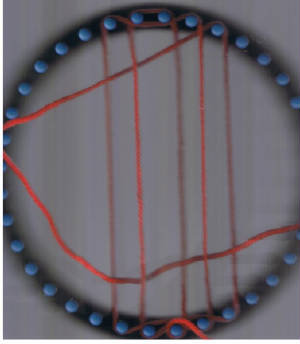
showing how the top and bottom is woven at the same time, as if by magic.
You will
soon see that you are actually weaving in a square, and that the first movement guarantees the same movement ( as a mirror
image) the other side of the square. This technique has several variations and the adventurous can visit Eloominations, on
the links page, to find other patterns to follow.
Once your
square is finished, do not take the yarn off the loom - this is very important! There will be gaps in your weaving. If they
are too big, thread extra yarn through, matching the original weaving, until the mesh is thicker. Its unlikely to show
once you have felted the completed item.
Now you are
going to start knitting.
You should
already have at least one thread around each peg.
Its best
if this and the following row are done in the same yarn as the base.
.
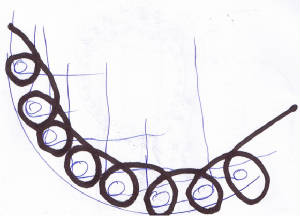
You wind
your yarn around each peg in an e, like this:
| The e knitting loom stitch |
|
you will
go around the loom twice, not too tight, then secure the end of the yarn on the side peg.
Use a crochet
hook, or something similar, to lift the bottom rows up over the top row, over and off the peg so they drop inside the loom.
That is your first row of knitting and secures the base to the sides. It could be a little stiff to do as you will be
lifting several threads, but don't worry as what follows gets easier as you go.
Unfasten
your yarn.
Wind another
e row, then repeat the hooking and lifting over again. Row number 2.
Now you can
change colours and use up any bits you fancy.
Changing
colours is actually very simple - secure the end of the new yarn around the side peg, then you just wind the new colour
in an e around the pegs and away you go. You hide the end bits later on, before felting.
You can add
as many rows as you want: I wanted a canister to store knitting needles in so mine is fairly high, and I was trying to use
up lots of bits of yarn as well.
Again, if
you are feeling adventurous, there are many loom-knitting sites on-line, with some fancy stitches, but plain works well, and
it all gets felted anyway so mistakes are not obvious.
Casting off
can be a bit more tricky, but the trusty crochet hook is a great help here as well.
I'm sure
someone will correct what I am about to say next, but this method worked for me! Starting at your first peg after the securing
peg at the side lift the yarn over onto peg number two, wind an e around it and cast off as normal. Repeat for every peg around
the loom. Keep your yarn loose otherwise it can get a bit of a struggle and the yarn break.
Others find
it easier to crochet off the last row, and do a slip stich in between each peg to keep the top flexible.
Hide all
your loose ends of yarn by weaving it back into your knitting.
What you
have should now look something like this, particularly where the weaving joins the knitting on the bottom.
| woven base and knitted sides |
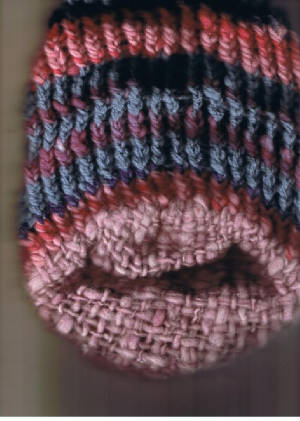
|
Once you
are satisfied that all the loose ends are tucked in, put your knitting in an old pillowcase, and toss it into the washing
machine in the hottest wash you can do. It felts better if there is something else in there with it. If its not small enough
yet, repeat the washing. When its felted enough, put it out to dry. You can pad it with screwed up plastic bags to help it
keep its shape.
Once dried,
you can embellish it any way you want.
I used yarn
from different sources, so the shrinkage was not consistant, but this can be used as a design feature if you want, by using
acrylic or nylon yarn doubled up with the wool, or even fancy yarns like feathers or lashes.
You can also
use these instructions with a small square loom, to make a square container, or even with a small tri-loom. Anyway, have fun!
click here
for the Loom Knitters Circle online (free) magazine full of patterns and tutorials.
(c) C Barlow 2006/2007

|