Spinning Down Under

How to build and use a tri-loom
Home | Drop Spindles | Fibre Prep 1 | Fibre Prep 2 | Carding with your fingers | Dyeing with Food Dyes | Spindling 1 | Spindling 2 | Alternative Spinning Tools | More on handmade spindles | DIY Wheels & More | Weaving Tools? | Card Weaving | Useful Weaving Tools | Little Looms Too | Little Looms 3 | Build aTri-Loom | The Backstrap loom | The Mapuche/Toba Loom | Links | About Me
The history of the triangle loom is obscure

but the beautiful shawls with the symmetrical stripes and tartans can be as simple or as complicated as the weaver wants. Many weavers have adapted patterns for multishaft looms with stunning results.


The tri-loom is not well known outside of the States, especially in Australia, where Australia Post regulations means one cannot import anything larger than the 3 foot size. Most, if not all, tri-looms in Australia are home made.


Making the loom is surprisingly simple as long as a few factors are remembered:


  • It’s a right-angled triangle, so one angle is 90 degrees, the other 2 are 45 degrees.


  • Each side, regardless of length, has the same number of nails or pegs; the distance between them is almost totally irrelevant.


  • The size of the loom is decided by the length of the longest side, the hypotenuse.


  • If you don’t drill the nail holes, the wood will split.


  • Tri-looms can be big looms and take up a surprising amount of space whether in use or not. I store mine on hooks on the curtain rod over the spare room window.


Here follows the instructions for a 6 1/2 foot loom, but the construction technique remains the same no matter how large or small.

triloom1.jpg

You will need a wood saw with a mitre box and an electric drill, preferably powered not battery run ( I burnt my cordless drill out on this). I used 2 x 2 Meranti, as its hard wood, and doesn’t weigh too much and is easy to get hold of.  For a 7 foot loom you will need just under 20 foot of wood. I used flat head nails as I couldn’t manage making all the pegs by myself, and split/cotter pins would have cost too much. I also used long bolts so that I could take it to pieces for storage.

Please note the diagram measurements are approximate and will need adjusting for your own loom. I don’t possess a work-bench so was working on the kitchen floor, the only almost level place I could find.


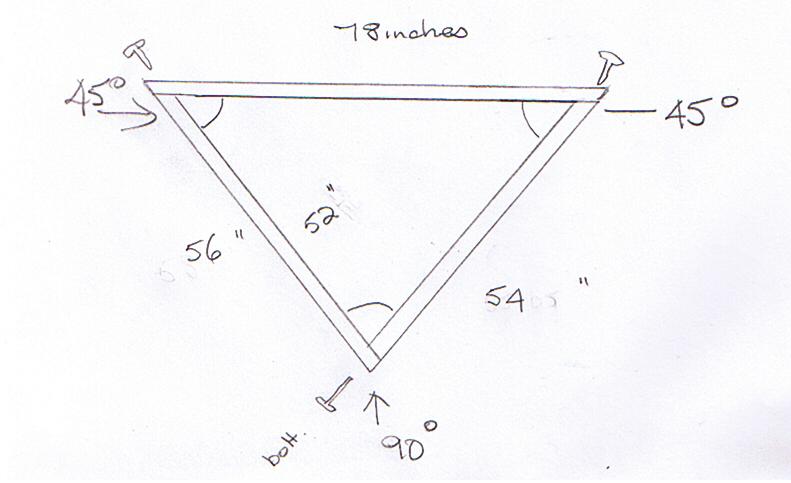
Measure out your hypotenuse, (mine was 78 inches with the ends cut at 45 degrees). This is the length of the outside edge of the wood. (As I already had a 3 foot loom to use as a prototype, I measured the smaller loom and divided the top length measurement by the side measurement to find out the ratios. I then divided my 78 inches for the top, which was the maximum length of wood I could get in the car, by the side length ratio to find out the approximate length of the sides. I added 2 inches for the width of the wood to one side piece. You can do this much easier by using 2mm graph paper and plotting it out, even if you have to calculate it as a quarter of a square. My husband found this process quite amusing, but it does work!)

The shorter pieces were approximately 56 inches long, with one end cut at an angle to butt the longest piece.

As you can see from the diagram, the sides are not the same length as I wanted to have the strongest join possible on the right angle join, so the width of the wood had to be deducted from the shorter piece. Check that everything fits together properly and you have the 90 degree angle and 2 x 45 degree angles, but do not join at this stage. You don’t even need to drill the bolt holes yet.


Now comes the fun part! I already had a 3 foot loom to work from, so the spacing between the nails along the hypotenuse was marked out and drilled at half an inch. This spacing allows thicker wools to be used in weaving without making it too difficult to use the side pegs/nails, which will be closer together.

To make sure that everything balances, work out from a center nail. I didn’t, and have had to add one.


Now you are going to start drilling, and this is back-breaking stuff, as well as seriously threatening the existence of your drill if you don’t take it slowly and give the drill time to cool down! You can then put the nails in, being careful not to split the wood.


Once the hypotenuse is done, count the number of pegs you have, and this is exactly the same number of nails/pegs you will have down each side. The corner nails/pegs are part of the count for each of the 3 sides. The spacing between the nails will not be half an inch, but less, which is why I say the distance between them is irrelevant.


Once again drill the holes, then tap the nails in. You can glue them into position if you want, and if you can get hold of 2 different colour nails, either alternate them, or make each fifth nail a different colour, as this will help you pick out any mistakes you might make in the weaving. Otherwise red texta on the wood will do the same job.


Once the nails are all in, using a metal drill bit, drill the hole for the bolts. You will probably go through a couple of nails, but that doesn’t matter. Then bolt it together, and you are almost ready to go.


I was going to build a stand for my loom, until an artists easel came on special, and the price was cheaper than the wood would cost to buy. They have since come down further in price. You will need a full-sized one and some clamps to hold it firmly in place.


Sand everything down very carefully. The last thing you want is your yarn catching on the loom. Some looms are then painted and varnished, and become real works of art in their own right. It’s a matter of personal choice.


Weaving On Your Tri Loom


Some people start with the point at the top. These instructions are for the point at the bottom.

I would like to thank all the people from the Yahoo TriLoom group, without who’s help I would never have got started using my loom.  The knowledge is theirs, any mistakes are mine.


To calculate how much yarn you will need, its basically the size of the loom x the number of nails down one side.

For mine it is 78 x 157 = 340 yards. If you are making a fringe as you go, which is the easiest way to do it, add double the length of the fringe to the length of your loom, so its 78 plus 8 ( for a four inch fringe) = 86 x 157 pegs = about 375 yards. A bit less in metres.  In weight my first shawl took 350 grams of mohair without a fringe and made a lovely airy delicate shawl, suitable for Australian conditions.


Regular (tabby) weaving is basically a matter of over-under, and the tri-loom is exactly the same, except you are weaving the warp and weft at the same time, and  you will be doing an over-under movement that will create warp and weft together, as if by magic.


At all times the start of any “throw” of the yarn starts at the top of the loom.


From the Left Hand Side the yarn comes over the first horizontal thread, under the second, over the third etc back down to the next peg to be used.

From the right hand side, it will come down under the first horizontal thread, over the second etc. You will find that as you do one side, the other side of the loom,  will do exactly the same thing! So you will need a tool like a ruler to make a path through the horizontal strands so you can pull your yarn through easily, with something such as a crochet or locker hook ( my locker hook is the most useful tool I have). It is important too, for your first experiment, not to use mohair as it clings horribly and is difficult to handle!


triloom2.jpg

I knot my yarn on the first top peg on the left hand side of the loom, bring it down to the topmost peg on the LH side and across to the topmost peg on the right-hand side. It then goes up around the peg on the far right of the hypotenuse, then back down over the horizontal yarn to the peg next to the one used just before, and back across to the left hand side, up over the horizontal yarn, and around the next vacant peg to the top left, to then come down under the top horizontal thread, over the next etc.


You carry on doing this until you come to the middle of the top of the loom, and this is where you need your central peg. If you look at your last throw, you will find that you have 2 threads in the same shed. Cut your yarn so that you have plenty to come down from the top of the loom to the point one more time, and thread it through the horizontal threads in between those two threads to balance your weave. Your shawl is nearly ready to take down off the loom.


If you took it down now, it would unravel, so the usual method of ensuring that doesn’t happen is to crochet off the top row. If you can’t crochet, use needle and thread to sew through each turn of the yarn to hold it together. Now you can take it off your loom.


The last procedure is to “full” your fabric, which is basically washing it gently, according to the instructions for the yarn you used, then “block” it into shape. Some weavers put it back onto the loom for that, although its not strictly necessary and could rust your nails.


The tri-loom group I have mentioned has plenty of pictures, patterns and information in its archives, as well as an unending patience when it comes to answering questions from newbies. There are many loom-builders on it, as well as some of the foremost weavers in the States, so its well worth lurking there, even if you are a bit overawed by all that knowledge and experience to begin with!

Wayne Schmidt's DIY site has instructions to build your own tri-loom at 

http://www.waynesthisandthat.com/triloom2.htm
 
If you are interested in taking this craft further, Barbara Herdman, an active and very experienced member of the Tri-loom Group, has just published a book which you can preview and purchase here: http://www.lulu.com/content/792110.   and you will find tutorials at her website here at  http://taliesin.confabulation.com/~workstead/howto.html 

Patricia Herman of the Tri-Loom group has also just published her first volume in a series on Tri-Loom weaving. You can find it from here:

Patricia's Handwoven

(c) C Barlow 2006/2007 AddThis Social Bookmark Button

The Yahoo Tri-loom e-group: